Adding a Notification Scene to an Apple Watch App in Xcode 14
Jan 28, 2023As you may know, one of the best ways for an iOS developer to start learning SwiftUI is to complete a SwiftUI tutorial from Apple in which you build a simple and neat app called Landmarks. This tutorial is a great start that can help you dive into SwiftUI and Combine and build a solid foundation to learn further things.
Unfortunately, as of January 2023, the tutorial is still built upon using Xcode 13, even though Xcode 14.2 is the latest version that has been released to date. This might not seem like a big deal until you reach one of the latest chapters: Creating a watchOS App. In this chapter you create a simple watchOS Companion App for your Landmarks app, and do some watch-related stuff, including creating a custom Notification interface.
The problem with using Xcode 14+ for this tutorial is that at some point, the tutorial asks you to modify files that exist only if you created a watchOS target in Xcode 13. These files are: NotificationView.swift, NotificationController.swift, and PushNotificationPayload.apns. It also asks you to run a notification scheme which does not exist if you’re doing the tutorial in Xcode 14:
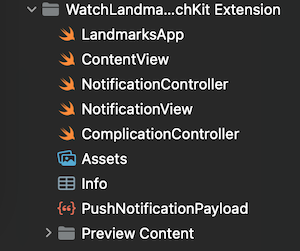 watchOS target files when created in Xcode 13
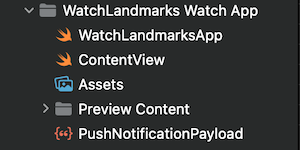 Same watchOS target files created in Xcode 14+
As you may see from the screenshots, by default Xcode 14 does not create files for custom notifications and complications. For some people, it might not be a problem as you can always create the necessary files yourself. But this is only true if you know what to create. If you haven’t worked with watchOS before or if this is your first time creating an iOS app at all, you might easily get stuck here. For example, it took me a good hour to figure out whether I did something wrong during the tutorial before realizing it happened because of a newer Xcode version.
So, if you found yourself in the same situation and get stuck while doing this tutorial, here are a few steps you need to do.
How to add a Notification Scene to a watchOS target in Xcode 14
Here I assume that you have already completed all the steps in the tutorial before moving on to the Section 5 — Create a Custom Notification Interface. That means you already created a Landmarks app (obviously) and also created a watchOS target and did some work on its files.
Step 1: Create a NotificationView.swift
Create a new SwiftUI View file in the WatchLandmarks Watch App folder. Name it NotificationView.swift:
import SwiftUI

struct NotificationView: View {
    var body: some View {
        Text("Hello, World!")
    }
}

struct NotificationView_Previews: PreviewProvider {
    static var previews: some View {
        NotificationView()
    }
}
Do not be confused about its stub content. The file will be modified during the next section of the Apple tutorial. For now you just need these files in a state they were created in Xcode 13.
Step 2: Create a NotificationController.swift
Create a Swift file called NotificationController.swift in the same folder:
import WatchKit
import SwiftUI
import UserNotifications

class NotificationController: WKUserNotificationHostingController<NotificationView> {

    override var body: NotificationView {
        return NotificationView()
    }

    override func willActivate() {
        // This method is called when watch view controller is about to be visible to user
        super.willActivate()
    }

    override func didDeactivate() {
        // This method is called when watch view controller is no longer visible
        super.didDeactivate()
    }

    override func didReceive(_ notification: UNNotification) {
        // This method is called when a notification needs to be presented.
        // Implement it if you use a dynamic notification interface.
        // Populate your dynamic notification interface as quickly as possible.
    }
}
Step 3: Create a PushNotificationPayload.apns
In the same folder, create an Empty file (bottom of the new file screen) and call it PushNotificationPayload.apns. Paste its contents:
{
    "aps": {
        "alert": {
            "body": "Test message",
            "title": "Optional title",
            "subtitle": "Optional subtitle"
        },
        "category": "myCategory",
        "thread-id": "5280"
    },

    "WatchKit Simulator Actions": [
        {
            "title": "First Button",
            "identifier": "firstButtonAction"
        }
    ],

    "customKey": "Use this file to define a testing payload for your notifications. The aps dictionary specifies the category, alert text and title. The WatchKit Simulator Actions array can provide info for one or more action buttons in addition to the standard Dismiss button. Any other top level keys are custom payload. If you have multiple such JSON files in your project, you'll be able to select them when choosing to debug the notification interface of your Watch App."
}
Step 4: Create a Notification scheme
Now you need to create a scheme to run a notification with a custom view you just created. Click the scheme selector in the Xcode toolbar and select New Scheme… in the dropdown:
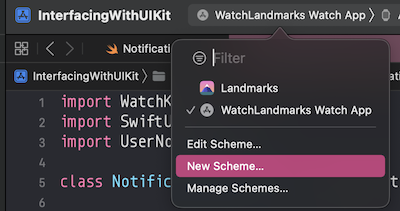 Schemes selector dropdown with New Scheme selected
Select the Watch App as the target and add (Notification) to the scheme name for the sake of clarity. Click OK.
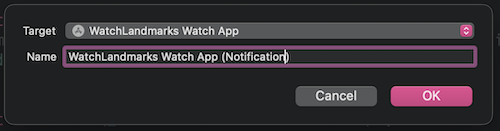 New Scheme popup with the right target selected
Click the schemes again, make sure the Notification scheme is selected, and click Edit Scheme. In the popup, select the Run row in the left panel, then change Watch Interface to Dynamic Notification. After this, the Notification Payload field should be automatically switched to PushNotificationPayload.apns.
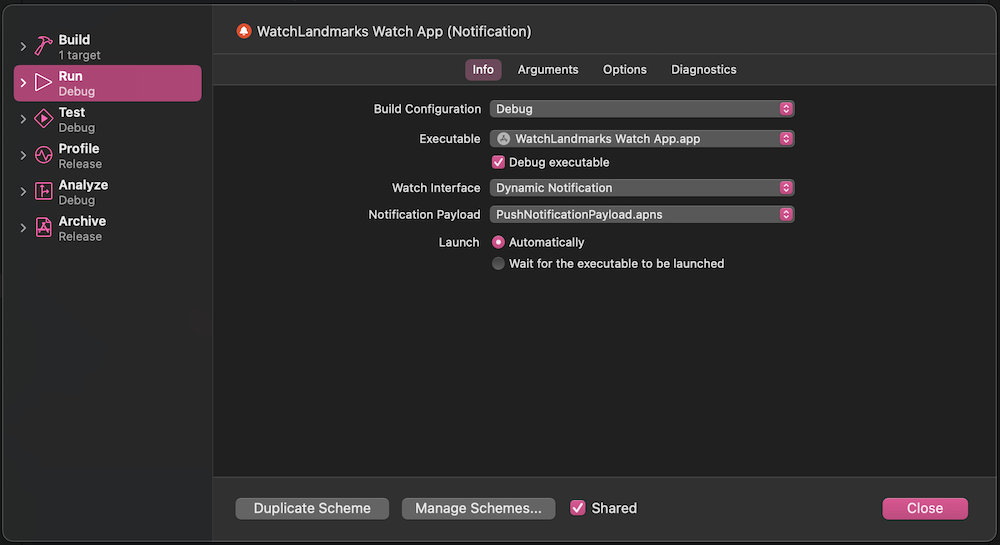 Edit Scheme popup after switching interface to Dynamic Notification
Click Close.
Final state
After doing the steps above, your watchOS target folder should look like this:
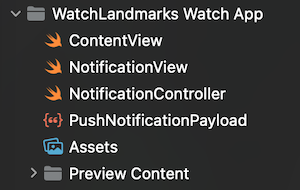 WatchLandmarks Watch App folder, 3 new files added. Notice: WatchLandmarksApp.swift is missing because it was deleted during the previous steps of the tutorial
You should also have a Notification scheme in the the scheme selector dropdown in the Xcode toolbar:
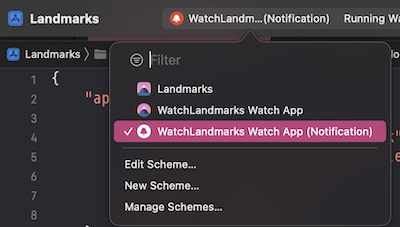
From this state, you can easily continue to the Section 5 — Create a Custom Notification Interface of the tutorial. Yay! 🎉
Further reading
If you need some advice on what to do next after completing Apple’s tutorial, you can check this awesome guide from James Haville: How To Learn SwiftUI And Combine From Scratch. Personally, I found it really helpful. You can also contact me if you have any questions or comments.
Happy coding!